Showing posts with label Tutorial. Show all posts

Internet Download Manager Review: Features, Supports, Where To Get, How To Install

Internet Download Manager Review: Features, Supports, Where To Get, How To Install

Posted by Superheatsink  |  at  8:08 PM

Internet Download Manager also known for IDM by Tonic Inc. This software is awesome, using this software save me a lot of time and 100% guarantee in what I am downloading. As a Computer Technician this is a "must have" application because this tool increase download speed for up to 5x faster than a normal downloading.


  • Key Features

1. Automatic downloading of any file type on the internet.
2. Divides downloads into multiple streams for faster downloading.
3. Resume downloads. It can resume and recover the file that you are downloading if download is interupt.
4. Schedule multiple downloads in Que.
5. Organize download location.
6. Best tool for downloading from streaming video sites.

  • Operating System and Browser Support

Operating System:  Microsoft Windows operating system (Xp, Vista, 7, 8)
Web Browsers:  Internet Explorer, Opera, Apple Safari, Google Chrome, Mozilla Firefox. That's the only browser that I've tested but I think this tool will also works in other browsers.

  • Where to get Internet Download Manager

You can get the latest version of this tool in their official website (http://www.internetdownloadmanager.com). You can try this for free in 30 days trial version but if you want it you can buy it for only $29.95 using credit card or Paypal as a payment method.

  • How to install

1. Get free or buy Internet Download Manager installer here www.internetdownloadmanager.com.
2. Run installer. Double click the IDM installer to run.
3. IDM installer wizard will appear. Click Next.
4. License agreement will appear. Click Next.
5. Choose a location for installation then click next.
6. Select a program manager group (do nothing). click Next.
7. Click next to start the installation of Internet Download Manager.
8. The program is now installing wait for a seconds.
9. Installation is complete click finish.
10. IDM extension will integrate to your browser restart your browser to apply changes.
11. Run IDM from your start menu.
12. Enter your registration details (First name, Last name, email and the serial number.
13. You can now enjoy using Internet Download Manager.

Tip: Visit official website to get the latest version and pricing of the software. For more information a leave comment below.

Step By Step Tutorial On How To Backup Files In Windows XP

Step By Step Tutorial On How To Backup Files In Windows XP

Posted by Superheatsink  |  at  4:39 AM

I would like to share an easy way to backup files in windows xp. I made this a step by step procedure to be more understandable specially to the newbie. Sometimes we are confused on what are the files that we need to backup on a computer specially if we are going to reformat the PC. The files that you need to backup could be the files in my documents, desktop, and local disk C, if your computer had other partition like for example local disk D and planning to re-partition your hard drive  you need also to backup the files on that partition but if you're not planning to re-partition your hardisk you don't need to backup the files on it instead you can make it the location for your backup files

Here's the step by step procedure to your files:

1. Go to my computer and go to your Local Disk C.


2. Inside your Local Disk C you will see a "Documents and Settings" Folder. Open it.
3. Inside "Documents and Settings" Folder you will see a user folder's. Select the right folder of the user, in my case I am using administrator account so my user folder is administrator folder. 


4. Copy the User Folder to your backup storage destination. That user folder contains the files from my documents and desktop. To make sure that you are copying the right folder open it and see if the user files is on that folder.


5. After copying the user folder go back to your local disk C, check if there is an important files stored in there. In my case there is no files to be back up in my Local Dis C, those folders that you see in the picture below is system files meaning you don't need to back up them because they will replace after the system re-installed.


6. Copy the files in other partition if you are going to re-partition your hard drive. If not, the user folder that you've copy earlier is the only files that you need to backup then you've done transferring your backup files and ready to begun installation.

Note: Before you reformat the computer take note also the important programs installed in the system in order for you to re-install those program after re-installing the operating system. 

How To Turn Your Windows XP SP2 To SP3 Using Regedit, Without Windows Updates

How To Turn Your Windows XP SP2 To SP3 Using Regedit, Without Windows Updates

Posted by Superheatsink  |  at  1:51 AM

I would like to share an important tip on how to turn your Windows XP SP2 to SP3 using regedit because recently I've encounter a situation wherein I need to install a program that is incompatible in windows xp service pack 2 (SP2). In our laboratory we are using xtenda xbox300 which is can only run in windows xp sp2 but I've been required by our computer programmer instructor to install Microsoft visual studio 2010 which is can only run in windows xp sp3 or higher operating system.

I've tried to install windows installer 3.1 but it doesn't work. I have no choice but to make solution for this in order for us to operate. I made research on the internet on how to fix this problem then I found out that you can turn windows xp sp2 to sp3 by editing the registry. It means to fake the compatibility requirements of the system, the program will think that it is sp3 but it is still an sp2 so you don't need to worry if  there is a device or program installed that has sp2 requirements like in my case the xbox300.

Editing system registry is crucial move you need to take the risk if you failed so here is the step by step procedure on how to turn your windows xp sp2 to sp3 using regedit.

1. Go to Run then type "regedit" and enter.
2. Expand HKEY_LOCAL_MACHINE.
3. Expand SYSTEM.
4. Click Windows.
5. Inside Windows right click CSDVersion then modify.
6. You will see a value data of 200 change it to 300 then click ok.
7. To finish restart your system and you're done.

I shared this topic in order to help those who are having a problem to install any program in windows xp sp2 because of the compatibility issue. This could be an easy way to turn your Windows XP SP2 to SP3  than performing windows updates or upgrading your operating system. This is proven that works on me.

How To Install USB Disk Security 6.3.0.0

How To Install USB Disk Security 6.3.0.0

Posted by Superheatsink  |  at  2:01 AM

Recently I posted a review about USB Disk Security 6.3.0.0 for windows by ZBshareware. As an additional review for that specific software here is an instruction on how to install USB Disk Security. First, you need to download USB disk security installer on their official website (http://www.zbshareware.com). After downloading the installer follow this following steps.

1. Run USB Disk Security Installer
2. Select Installation language. Click OK.


3. Select Your Destination Location. Then Click Next.
4. Safe Web Navigation Option. This is optional you can unchecked the box if you don't want to make Linkzb.com as your browser's start page. Click Next.
 5. Select Additional Tasks then click next.
 6. Setup is now ready to begin installing USB Disk Security on your computer. To begin click install.
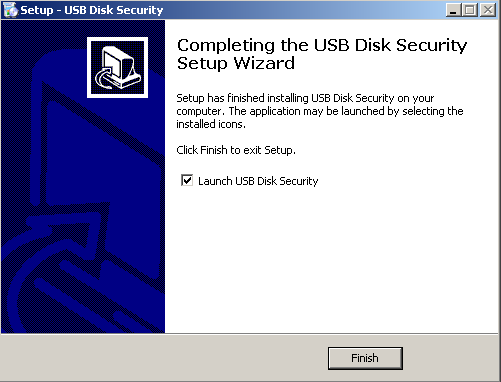
 7. Completing the USB Disk Security Setup Wizard Click Finish.
8. Your Computer is Protected.


USB Disk Security 6.3.0.0 is a free software and there is no conflicts with all antivirus software. This is compatible in all windows operating system even in windows 8. Install USB Disk Security to prevent any threats coming from USB storage and protect your computer from getting slow and malfunction cause by viruses.

How To Fix Windows 7 Startup Problems

How To Fix Windows 7 Startup Problems

Posted by Superheatsink  |  at  10:00 PM


There is a client came to me this morning and She is asking to fix her laptop "Acer Aspire v3-471g". When I examine it I figure out that the operating system of the unit was corrupt or unable to log on to windows. I tried to troubleshoot the problem I've tried to log in to safe-mode, use windows start-up recovery, acer recovery tools, windows Live CD, System Restore etc. but it didn't work then I found out that the operating system installed in her laptop is Windows 7 Home Basic. Thinking to solve the problem by re-installing the original operating system, I go to the internet and download Windows 7 Home Basic then I burnt it into a DVD. But  when I tried to repair the Operating System it still doesn't work. So, I talked to the owner and suggest her a solution, that is to reformat her laptop.

With the approval of the owner I reformat her laptop and because of a good hardware specifications of the system unit I've decided to upgrade the operating system to Windows 8 Professional 64-bit. Finally, the Laptop was fixed but sad to say I didn't recover her important files. I was planning to remove the disk and convert in to external hard-drive to back up the important files but I'cant do it because the system is still under warranty and it could make a conflicts between me and the distributors of the system if there is some problems exist.

Possible solutions to fix windows 7 start-up problems:

1. Try to Log in to safemode. If logging in to safemode is possible it means that it is a minor problem, Try to execute Disk Checking. The Problem is probably cause by not properly shutting down the system.

2. Use Windows Start-up recovery. This is a Built-in recovery tools by windows 7 but you can also perform this using a bootable windows installer.

3. Use Recovery Tools. In my case I use Acer recovery tools because the unit that I am trying to fix is made by Acer.

4. Try to Restore the System by using System Restore. You can use Windows installer to perform system restore but it is only available if the system has created a system restore back up image before the problem occur.

5. Use Windows Live CD. The purpose of this is to Log-in to a virtual windows in this state you can do things like disk checking, fragmentation, back up files etc. that can help you to recover the system.

6. Repair the existing operating system. In my case the existing operating is Windows 7 Home Basic so I download and burnt it in DVD then I tried to Re-install the Operating System.

7. If solutions 1-6 won't work your final solution is to reformat the system.

How To Show Hidden Files On A USB

How To Show Hidden Files On A USB

Posted by Superheatsink  |  at  3:01 AM

How to recover files hidden by a virus
Yesterday, one of my student came to me and she is asking for help about her USB drive. When I examine the device there is no files inside on it but when I look in the properties of the device there is an amount of used space in the USB, it means that her files is hidden by a virus. Thinking that this problem is easy to solve like a normal hidden files, I go to the windows folders options of my computer under the advance setting of files and folders I activate the "show hidden files and folders" but it doesn't work.

In order to help my student, I've done research on how to recover files hidden by a virus. I discover that the kind of virus that infect the USB drive is Autorun.ini. Autorun.ini are used by virri to get windows to run the actual virus without any input from the user like double clicking on the file. If you open the file in a text editor you will most probably find it calling an .exe file and hide your original files.

Here's the solution for the problem:

1. Insert the USB Drive in the computer.
2. Go to "my computer" and take note the drive letter of the USB Drive. Ex: Removable Disk (F:), it means that your drive letter is "F:".
3. Go to "Command Prompt". Click "Start" go to run type "cmd" then press enter.
4. In your Command Prompt. Type the drive letter of your USB drive, don't forget the colon(:). Example: F: then press enter.
5. Type "attrib -s -h /s /d *.*" then press enter. Wait for a while until the drive letter of your USB came out. After that its already finish, close your command prompt.
6. Open the USB Drive in "my computer". You will see an untitled folder or drive icon, inside it is your files.

attrib -s -h /s /d *.* means clear an attribute in read only file, archive file, system file and hidden file.

To Avoid viruses like Autorun.ini use USB Disk Security 6.3.0.0. It helps to protect your PC from any threats coming from USB Storage. 

Best Performance Windows XP

Best Performance Windows XP

Posted by MJ  |  at  7:53 PM


After installing Windows Xp its default settings is its the best appearance. You can adjust your Windows Xp to its best performance by changing its visual effects and disabling some windows appearance properties.

When you adjust windows xp to its best performance it disable:

  • Animation of windows when minimizing and maximizing
  • Fade or slide of menus into view
  • Fade or slide of tool-tips into view
  • Fade out of menus items after clicking
  • Show of shadows under menus
  • Show of shadows under mouse pointer
  • show of translucent selection rectangle
  • Show of window contents while dragging
  • Slide of open combo boxes
  • Slide of task-bar buttons
  • Smooth edges of screen fonts
  • Smooth scroll of list boxes
  • Using of background image for each folder type
  • Using common task in folders
  • Using drop shadows for icon labels on the desktop
  • Using Visual styles on windows and buttons

To adjust windows xp into its best performance follow this steps:

1. Go to "My Computer" right click go to "properties".
2. System properties window will appear, go to "advance" tab.
3. In Performance level click "settings".
4. Performance window will appear choose "adjust for best performance".
5. Click Apply then OK. Windows Xp is finish setting to its best performance.

This is a basic way of making windows xp to its best performance if you want to maintain your computer performance apply the important things to do after installing windows.

How To Clone A Hard Drive

How To Clone A Hard Drive

Posted by MJ  |  at  4:58 AM


Cloning a disk is one of the fastest way of copying all programs and files from a hard disk to another hard disk of a computer it is very useful when you are going to setup many computers. It is a process of transferring all installed programs etc. from a hard disk to another hard disk in a fastest way you don't need to install all programs per computer better to do is to perform a Disk Drive Cloning . Disk Drive cloning can perform using a disk cloning software or utilities like acronis cloning utilities, Hiren's Boot CD and more. First thing you need to do is to make a source hard drive. The Source Hard Drive is a Hard Disk that are completely installed. Better to reformat first your source Hard Drive then installed all programs you are going to be needed. Then if you have already your Source Hard Drive Time for you to do a Disk Drive Cloning.

Things needed:

1. Source Hard Drive
2. CD ROM Drive or DVD ROM
3. Disk Cloning Utility
4. Destination Hard Disk Drive - This could be the destination of all programs and files from your Source Hard Disk.

Insert your CD ROM Drive, Source Hard Disk Drive and your destination hard disk. make sure that all the drives are detected by your system and set your Source Hard Drive in BIOS as a Primary Master then set also your CD ROM Drive as a First Boot Device. After Configuring that settings insert your boo-table CD of Disk Cloning Utility. Because of the settings you've configure the system will first read the cd from your CD ROM Drive (that is your Disk Cloning Utility) then read and follow the instruction from of the utility disc on how to perform a Disk Clone. Cloning Process take at least 30 to 40 minutes. After Disk Cloning test your destination disk if it is working and if it is the same to your Source Disk. If it is totally working change some settings in your clone disk like IP Address and Full computer name to avoid Conflicting of the systems in a network. Rest your Source Disk up to 15 minutes before clone another disk to avoid Over Heating of a Drive. 

How To Manually Put In I.P Address

How To Manually Put In I.P Address

Posted by MJ  |  at  6:25 AM


Sometimes we can encountered a network problem called "Conflict IP address in a network". It means there is two or more the same IP address in your network or Computer. Sometimes it is happening when your IP address was obtain automatically. There is a way to avoid conflicting of IP Addresses in a network and that is manually putting of a static IP address in your computers.

Follow this Instructions on how to manually set a static IP Address in a Network Computers.

1. Right Click the Icon of "My Network Places" then go to properties.
2. Right Click the "Local Area Network Icon" then choose properties.
3. Local Area Network Properties will appear, The double click on the "Internet Protocol (TCP\IP).
4. Then the Internet Protocol (TCP\IP)Properties will appear. Click "Use the Following IP Addresses".
5. Then you can now set manually an Ip Address on that computer. Including your subnet mask "255.255.255.0" and the default gateway of the internet server.
6. If you are connected on the internet Put a Preferred DNS Server same as the IP address of the default gateway then click Ok.


How To Copy Files In Command Prompt To USB

How To Copy Files In Command Prompt To USB

Posted by MJ  |  at  10:50 PM

You can use this tips if you want to back up your files from your Universal Serial Bus (USB) to your computer safely when you are going to format your USB Drive because of the viruses. You don’t need to open your USB Drive to copy your files and paste it in your computer storage if you do that there is a possibility to infect your system by the viruses from your USB Drive. You can back up files from USB to computer using a command promt.


First thing to do is open command promt by clicking Start > All Programs > Accessories > then Command Promt, or you can do it faster by clicking Start > Run > Then Type “cmd”. When the Command Promt appear type the corresponding letter of your usb like for example is F: then press enter. Now you are in your USB Drive type “dir” to display the directory of all files files in the USB then type “attrib”. All files in your usb will appear in command prompt. Next Command is “copy” it goes like this, if you want to copy all word documents like for example in the drive D: of your computer follow this command type “copy (file name) d:” for example the file name is “backupme.doc” the command goes like this “f:\copy backupme.doc d:”. The same way to other file like like music, pdf, excel,PowerPoint and more just type copy (space) file name (space) destination. How about when you want to copy all word documents at the same time? It is possible just follow this command, copy (space) *.doc (space) d: (The Symbol * means all) so all word documents will be copied in your destination d:. If your files is in a folder inside your USB the command is “Copy (space) folder Name (space) Destination. For example the name of your folder is “music” the command looks like this “copy music d:” The last command is if you want to copy all files from your USB including documents, music, folders, and other. Type copy (space) *.*(space) destination. (copy *.* d:)

For some questions and additional information please leave a comment below this post thank for reading hope this post can help you. For more tips in PC Maintenance and Troubleshooting click the text link.

How To Remove Virus In Computer Without Antivirus

How To Remove Virus In Computer Without Antivirus

Posted by MJ  |  at  11:58 PM

Viruses is one of the biggest problem of our computer system. Viruses can cause your PC to be Always hang, Computer Operating System Corrupt, Hard disk drive Bad sectors and more. There are also many ways on how to remove those viruses, you can remove it by scanning your drives using your anti virus and you can also remove it manually using a command prompt. Scanning of viruses using of your Anti virus is very common so I will going to give you a tips on how to remove viruses using a command prompt.

Follow this instructions:
  • Go to command prompt. click start > run > then type "cmd".
  • Command Prompt will appear then type the drive letter. Example: you want to remove viruses in your drive d:.
  • Type d: (colon) and press enter.
  • Then type "attrib" then press enter.
  • Directories from drive d: will viewed. Find the batch file of the viruses like .bat, .inf, and sometimes .exe ( be careful in deleting the .exe batch file it is an installer of a software but if you see a mysterious .exe file that is a virus example are : new folder.exe and sex.exe.)
  • Delete viruses using a command "del" and the virus name it goes like this " del (space) bungoton.bat" then press enter.
  • After deleting all viruses restart your computer.
  • after the restart go again in the command prompt then type the drive letter and press enter and type "attrib" then enter.

If the viruses that you delete before you restart your PC is back I recommend you to reformat your computer but if the viruses are gone after you restart your computer it means you made it successful.

How To Get My Computer Icon Back On Desktop

How To Get My Computer Icon Back On Desktop

Posted by MJ  |  at  11:17 PM

Sometimes its happening after reformatting a computer some desktop icons are missing such as My Computer, My Network Places, My Documents and Internet Explorer. Those icons are very important to seen in desktop specially to those people who are unfamiliar in using a computer it helps them to have a shortcut icons.

Follow this instruction on how to get back the missing desktop icons on your desktop.


This is a desktop without some important icons you can't see the icons of My Computer, My Network Places My Documents and Internet Explorer.


First thing to do is you'll go to the desktop properties. To do this you have to right click in the desktop then click Properties.


The Display Properties will appear. Click Desktop Tab.


Then Click the Customize desktop tab.


Then the desktop items will appear.


In desktop Items you will see the four unchecked boxes named: My Documents, My Computer, My Network Places, and Internet Explorer. Next thing to do is you have to check the boxes by clicking it then Press OK.


Almost Done! the missing desktop icons finally back in the desktop.
Many ways on how to get back those icons in the desktop but I think that's the proper way on how to get it back.

Copyright © 2013 PC MAIN. WP Theme-junkie converted by BloggerTheme9
Blogger template. Proudly Powered by Blogger.
back to top